
1. Introduction
Choosing the correct bathroom grab bar height helps make a bathroom more accessible and provides a secure place to hold while standing, sitting, entering a shower, or getting out of a bathtub. The right position depends on the bar’s location, orientation, bathroom layout, and the person who will use it.
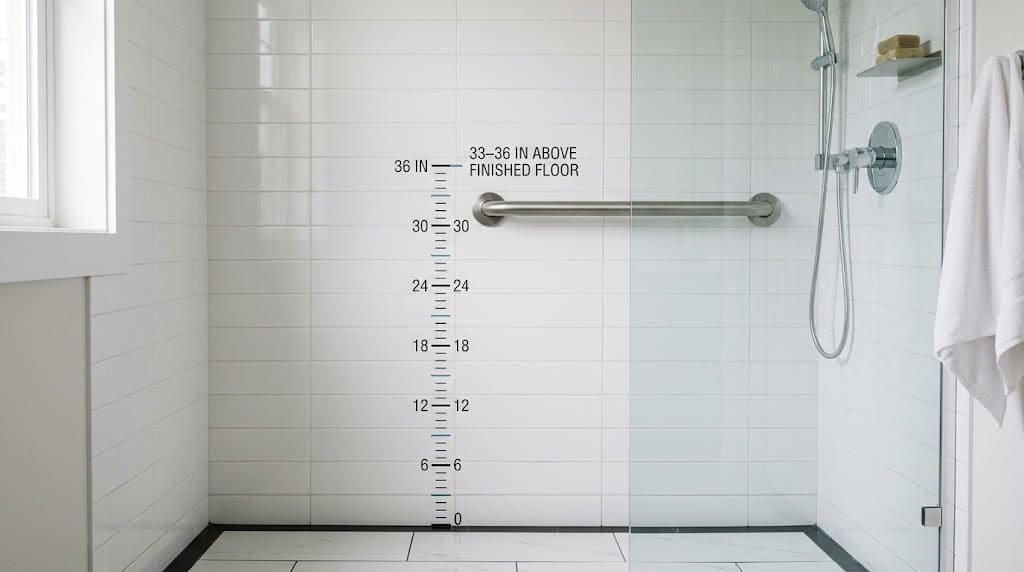
For applicable accessible facilities in the United States, the ADA Standards generally require horizontal grab bars to be installed 33–36 inches above the finished floor, measured to the top of the gripping surface. One important exception is the lower horizontal grab bar on the back wall of certain accessible bathtubs, which is positioned 8–10 inches above the tub rim. These are specific accessibility requirements, not universal installation rules for every private home. (2010 ADA Standards, Sections 607 and 609).
Whether you are planning a shower upgrade, adding support beside a toilet, or improving an existing bathroom, understanding these measurements can help you plan a safer installation. This guide explains the relevant height requirements, how to measure correctly, and what to consider before mounting a grab bar.
For a broader look at grab bar styles, placement, installation, and bathroom safety, explore our complete guide to bathroom grab bars.
Table of Contents
2. What Is the Standard Bathroom Grab Bar Height?
For horizontal grab bars covered by the ADA Standards, the specified height is 33–36 inches from the finished floor to the top of the gripping surface. This is the primary reference range for many accessible toilet, shower, and bathtub installations.
However, the appropriate height for a residential bathroom may depend on the user’s needs, the bar’s orientation, the installation location, and applicable building codes.
The 33–36-Inch Height Range Explained
The ADA’s 33–36-inch range establishes the required height for applicable horizontal grab bars. It is intended to provide a consistent gripping position in covered accessible facilities.
| Measurement | What It Means |
|---|---|
| 33 inches | The minimum height for applicable horizontal grab bars. |
| 36 inches | The maximum height for applicable horizontal grab bars. |
| Where to measure | Measure to the top of the grab bar’s gripping surface. |
| Starting point | Measure upward from the finished floor, unless a specific requirement uses a different reference point. |
The range should not be interpreted as a universal requirement for vertical or angled grab bars. This height guideline does not apply uniformly to all grab bars in every residential bathroom.
For residential bathrooms, the best practical position should account for the intended user’s reach and movements while meeting any applicable accessibility and building requirements.
Where to Measure Grab Bar Height From
Measure grab bar height from the finished floor to the top of the gripping surface when that is the reference specified by the applicable standard.
The finished floor is the completed walking surface, not the subfloor beneath the flooring. The gripping surface is the part of the bar that the hand holds.
Do not confuse the gripping surface with the mounting flanges, screw holes, or centerline of the bar. These points can be at different heights.
For instance, if a horizontal grab bar needs to sit 34 inches above the finished floor, mark the wall based on where the top of its gripping surface will be once installed. Before drilling, consider the bar’s design and mounting brackets to determine the correct screw-hole positions.
Bathtub installations require special attention because certain bars are measured from the tub rim rather than the floor. Those measurements are explained in the bathtub section below.
ADA Requirements vs. Residential Recommendations
The Americans with Disabilities Act (ADA) Standards establish accessibility requirements for covered facilities. They do not automatically impose the same installation requirements on every private residential bathroom.
The distinction matters when planning a home modification. A homeowner may be improving accessibility for a family member without working on a facility covered by the ADA. In that situation, the user’s needs, the product instructions, and applicable state or local building codes help determine the appropriate installation.
For covered facilities, follow the applicable ADA provisions rather than relying solely on a general home-improvement recommendation. For residential installations, consider consulting a qualified installer or accessibility professional when the correct placement is uncertain.
The U.S. Access Board’s official accessibility guidance provides the technical requirements for grab bars in applicable toilet and bathing facilities.
3. How High Should a Shower Grab Bar Be?
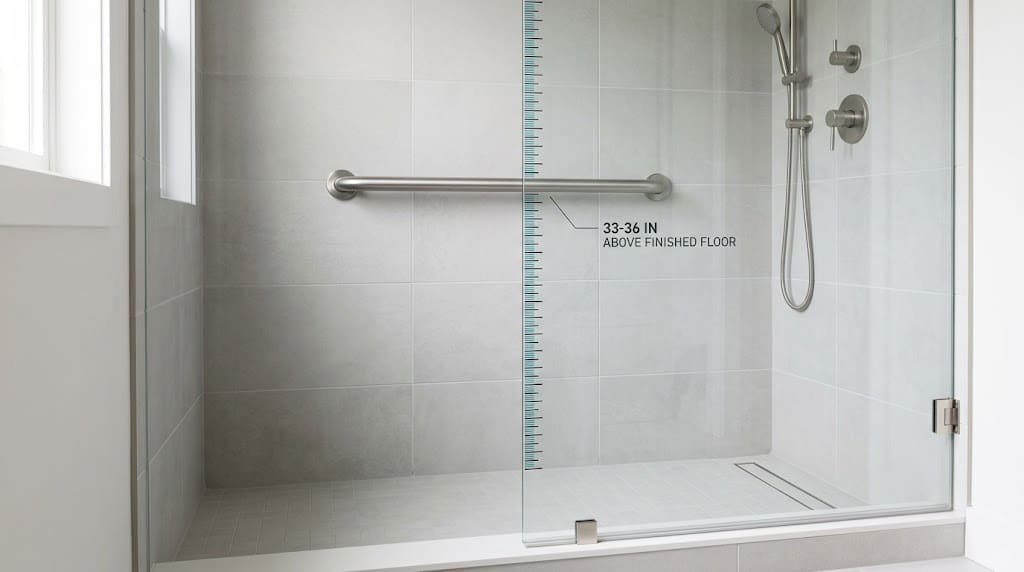
For a horizontal grab bar in an applicable ADA-compliant shower, the general specified height is 33–36 inches above the finished floor to the top of the gripping surface. The exact arrangement depends on the shower type, wall configuration, seat, and other applicable accessibility provisions.
In a private home, placement should also account for the movements the bar is intended to support.
Horizontal Shower Grab Bar Height
A horizontal shower grab bar provides a gripping surface along the wall while the user stands, changes position, or moves within the shower.
For covered accessible installations, use the applicable 33–36-inch height range and check the requirements for the particular shower configuration. The correct position is not determined by the showerhead height or the location of the faucet.
Before marking the wall, consider:
- Where the user stands while showering.
- Whether the bar will support balance, movement, or a transfer.
- The location of the shower controls and spray unit.
- Whether a shower seat affects the intended gripping position.
- The required bar length, clearance, and mounting support.
The U.S. Access Board’s bathing-room guidance explains how grab bars relate to accessible shower and bathtub configurations.
Vertical Grab Bar Placement at the Shower Entrance
A vertical grab bar near the shower entrance can provide a convenient gripping point when stepping into or out of the shower. Its position should allow the intended user to reach it before moving over the threshold or changing footing.
There is no single universal vertical-bar height that applies to every bathroom. The suitable position depends on the user’s reach, the entrance layout, and the movement the bar is intended to support.
For a residential installation, identify a comfortable gripping area and verify that the bar will not obstruct the shower door, controls, or other fixtures. Where accessibility standards apply, check the relevant provisions for the specific configuration rather than applying the horizontal-bar height range automatically.
Grab Bar Height Near a Shower Seat
A grab bar near a shower seat should support the movements the user needs to perform, such as sitting down, standing up, or transferring onto the seat.
Consider the seat’s height, the user’s reach while seated, and the direction in which the person moves. A bar positioned comfortably for someone standing may be difficult to reach from a seated position.
For an accessible shower, follow the applicable requirements for the shower type, seat, and grab bar arrangement. In a private home, a qualified occupational therapist or accessibility professional can help assess the position when the user has limited mobility or needs transfer assistance.
Practical takeaway: Choose shower grab bar height by combining the relevant standard with the actual shower layout and intended use. A measurement alone cannot determine the best position for every user.
4. What Is the Correct Bathtub Grab Bar Height?
Bathtub grab bar height depends on the bar’s location and the tub configuration. Under the applicable ADA provisions, the main horizontal back-wall bar is positioned 33–36 inches above the finished floor, while a lower horizontal back-wall bar in specified bathtub configurations is positioned 8–10 inches above the tub rim.
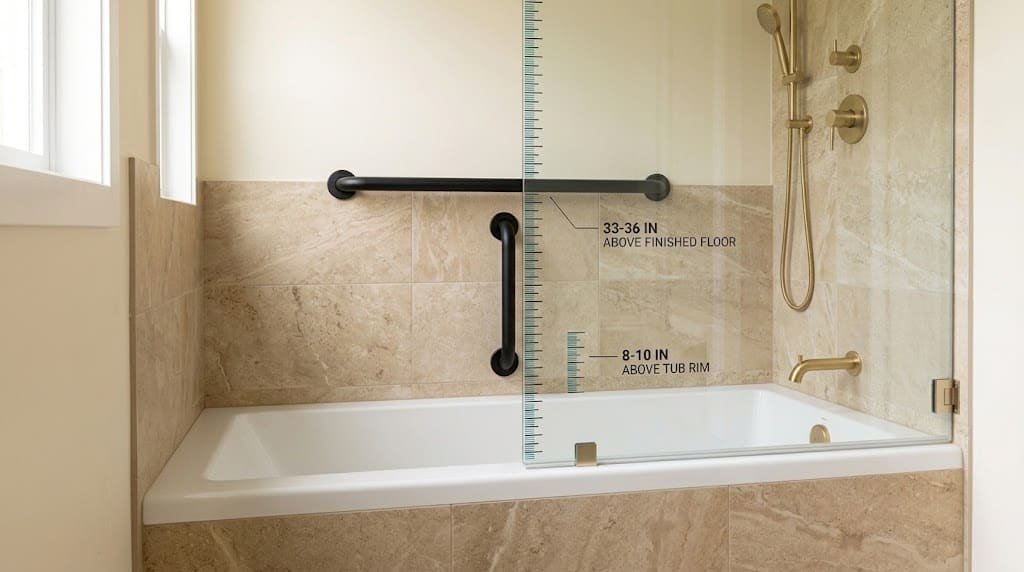
These measurements use different reference points and should not be confused.
Horizontal Grab Bar Height Along the Bathtub Wall
For the applicable ADA bathtub configurations, the main horizontal grab bar on the back wall follows the 33–36-inch range measured to the top of the gripping surface above the finished floor.
The required arrangement also depends on whether the bathtub has a permanent seat or uses a removable in-tub seat. The applicable provisions specify the number, position, and minimum length of bars on the back and end walls.
When planning a residential installation, consider where the user needs support while sitting down, standing up, or moving into and out of the tub. The bathtub’s dimensions, the height of its rim, the position of any seat, and the wall’s structural support all influence where grab bars should be placed.
Do not assume that installing one bar at the standard horizontal height automatically provides every type of support needed around a bathtub.
How High Should the Lower Bathtub Grab Bar Be?
For bathtub configurations covered by the relevant ADA provisions, the lower horizontal grab bar on the back wall must be positioned 8–10 inches above the bathtub rim. This requirement applies to specified accessible bathtub arrangements, rather than to every residential bathtub.
The lower bar is measured from the tub rim, not from the finished floor. The main horizontal bar, by contrast, is measured using the applicable floor-based height requirement.
For example, a lower bar placed 9 inches above the tub rim would fall within the specified 8–10-inch range for an applicable configuration. That example should not be used as a universal placement recommendation for all tubs.
Check the applicable provisions in ADA Section 607, Bathtubs, before finalizing an accessible bathtub layout.
Vertical Grab Bars for Bathtub Entry
A vertical grab bar near the open side of a bathtub may provide a gripping point when stepping over the tub wall. Its position should allow the user to reach and hold the bar without twisting awkwardly or leaning excessively.
Consider the user’s standing reach, the height of the tub rim, the location of the faucet and controls, and the direction of entry. The bar must also be securely anchored to suitable structural support.
For a private home, personalize the arrangement to the user and verify local requirements. If the installation must comply with the ADA, follow the relevant requirements for the specific bathtub configuration; a vertical entry bar does not replace any required horizontal bars.
5. How High Should Toilet Grab Bars Be Installed?
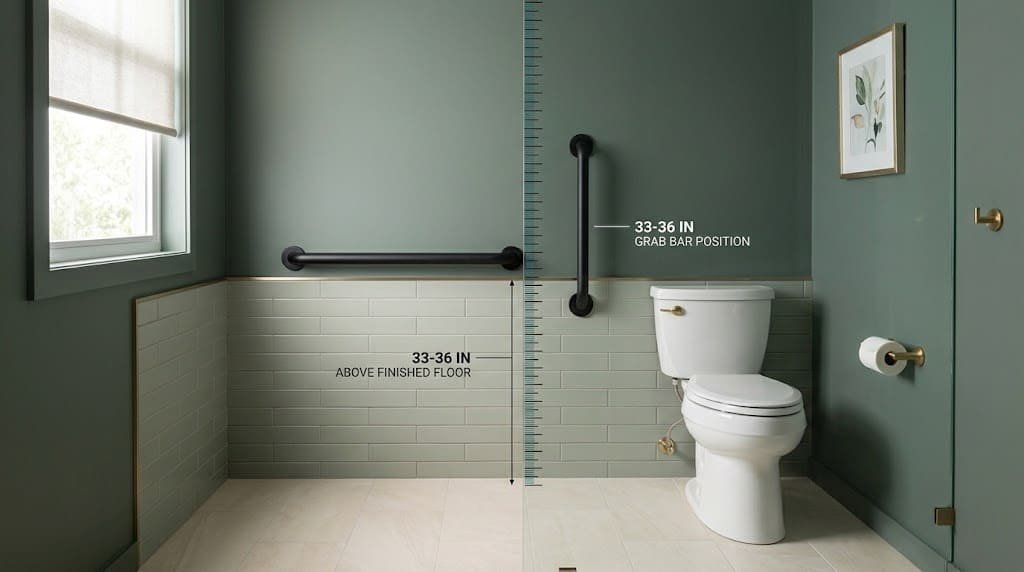
For applicable accessible toilet installations, horizontal grab bars beside and behind the toilet are generally positioned 33–36 inches above the finished floor, measured to the top of the gripping surface. Their required lengths and locations differ, so height is only one part of the installation.
Side Grab Bar Height Beside the Toilet
A horizontal side-wall grab bar in an applicable ADA-compliant toilet installation follows the 33–36-inch height range.
Its position should also provide the required length and location alongside the toilet. The ADA Standards include additional requirements for the side bar’s placement relative to the toilet and nearby fixtures.
For a residential bathroom, consider where the user places their hands when sitting down or standing up. The bar should be reachable from the position in which it is intended to provide support.
Before installation, check the toilet’s location, wall structure, toilet paper holder, and available clearance. Do not choose a height based only on the height of the toilet tank or nearby fixtures.
Rear Grab Bar Height Behind the Toilet
The rear horizontal grab bar in an applicable accessible toilet installation also follows the 33–36-inch height range.
However, the rear bar has its own length and placement requirements. Its position should be assessed alongside the side bar, toilet location, and surrounding wall space.
In a residential bathroom, the most practical layout may depend on the user’s movement and the bathroom’s configuration. If the installation is intended to comply with accessibility standards, verify the specific provisions for the toilet and grab bar arrangement.
The U.S. Access Board provides detailed guidance on the applicable toilet-room accessibility standards.
Vertical and Fold-Down Toilet Grab Bars
Vertical and fold-down grab bars require a different placement assessment from a standard horizontal wall-mounted bar.
A vertical bar may provide a useful gripping point for a particular movement, while a fold-down bar can offer support beside a toilet where a fixed side-wall installation is impractical. The suitable position depends on the product design, intended user, and installation configuration.
Do not automatically apply the 33–36-inch horizontal-bar requirement to every vertical or fold-down product. Check the applicable accessibility provisions, local building requirements, and manufacturer instructions.
Fold-down bars also need appropriate structural mounting and sufficient clearance to move into their intended position without obstructing the user or nearby fixtures.
What Is the Recommended Distance Between a Toilet and a Grab Bar?
The distance between a grab bar and a toilet depends on the bar’s location, length, and the applicable installation requirements. There is no single distance that describes every side-wall, rear-wall, or fold-down arrangement.
For an accessible installation, use the specific dimensions in the applicable ADA provisions rather than estimating the distance from the toilet’s centerline or tank. In a private home, also consider the user’s reach and the space needed to sit, stand, or transfer safely.
6. How Does Grab Bar Orientation Affect Height and Positioning?
Grab bar orientation influences how a person grips the bar and the movements it can support. Horizontal, vertical, and angled bars offer different gripping positions, so their placement should reflect the intended task rather than a single universal height.
Horizontal Grab Bar Height and Positioning
Horizontal grab bars provide a continuous gripping surface at a consistent height. They are commonly used along shower walls, bathtub walls, and beside toilets.
For applicable ADA installations, the specified horizontal height is 33–36 inches to the top of the gripping surface above the finished floor, subject to particular provisions for specific locations.
When planning a horizontal bar, consider the length of the wall, the intended gripping area, nearby fixtures, and the movement the user needs to perform. A correctly measured bar may still be inconvenient if it is too short for the required reach or obstructed by another fixture.
Vertical Grab Bar Placement
Vertical grab bars provide a gripping surface across different heights. They may be useful near a shower entrance or bathtub edge where a user needs to grasp the bar while changing position.
Their height and location should be selected according to the user’s reach and the movement involved. For example, a person stepping into a shower may need a different gripping position from someone who uses a bar primarily while rising from a seated position.
Before installation, consider:
- The user’s comfortable standing reach.
- The point where support is needed during entry or exit.
- The distance from the bar to the user’s natural hand position.
- The available wall space and structural mounting support.
Check the applicable requirements for the specific facility and installation. Do not assume that a horizontal grab bar’s prescribed height also establishes a universal height for vertical bars.
Angled Grab Bar Placement
Angled grab bars provide gripping points at different heights along the same bar. Depending on the user’s needs and the installation, this arrangement may support movements involving both pulling and lowering.
The correct angle and position depend on the user’s reach, the direction of movement, and the bathroom configuration. A bar that is easy to grasp at one end may be difficult to reach at the other.
For residential installations, assess the intended user’s movements before deciding where to mark the wall. If the project must meet accessibility requirements, verify that the selected configuration complies with the applicable standards.
Key distinction: Height, orientation, and length are separate design decisions. Selecting the right height does not automatically establish the correct angle, location, or mounting arrangement.
Correct height is only one part of safe grab bar installation; the location and orientation of each bar also matter. Learn where to place grab bars in your bathroom for better support around showers, bathtubs, and toilets.
7. How Do You Choose the Right Grab Bar Length and Position?
The correct bathroom grab bar length depends on the location, available wall space, intended support area, and any applicable accessibility requirements. Height determines the vertical position, while length and placement determine how much of the wall provides a usable gripping surface.
Common Bathroom Grab Bar Lengths
Bathroom grab bars are available in a range of lengths. Common retail sizes include 12-, 16-, 18-, 24-, 32-, and 36-inch models, although availability varies by manufacturer and product line.
A longer bar can provide a wider gripping area, but it must fit the wall and meet the requirements of the intended installation. A shorter bar may be suitable for a limited space or a particular task, but it should not be substituted for a longer bar required by an applicable accessibility standard.
When choosing a bar, compare:
- Available wall space: Check the distance between corners, fixtures, and other obstructions.
- Identify the exact spot where the user needs to hold the grab bar for support.
- Required dimensions: Verify the minimum length and location for the specific accessible configuration, if applicable.
- Mounting points: Make sure the selected bar can be secured according to its installation instructions.
For covered accessible installations, the ADA Standards specify different minimum lengths and positions for particular toilet and bathtub grab bars. These requirements take precedence over choosing a product based solely on convenience.
How Long Should a Grab Bar Run Along the Wall?
A grab bar’s required extension along a wall depends on the location and the applicable standard. Toilet, bathtub, and shower installations have different configuration requirements, so a single extension distance is not appropriate for every bathroom.
For example, an accessible toilet installation has specific requirements for the side and rear bars, while bathtub provisions specify positions relative to the tub’s head and control ends.
Before installing a bar, check the relevant dimensions for the intended configuration. Also confirm that the bar will not obstruct controls, a shower door, a transfer area, or another required clearance.
In a private home, the bar should provide a usable gripping area for the intended person without creating unnecessary obstacles. If you are unsure how far it should extend, consult the product instructions or a qualified installer.
How to Adjust Grab Bar Placement to Individual Needs
In a private bathroom, grab bar placement should account for the person who will use it. A position that works for one person may not be convenient for someone with a different reach, grip, balance, or mobility level.
Consider the movement involved at each location:
- Shower: Where does the user stand when reaching for support?
- Bathtub: Where does the user need to grip the bar while stepping over the rim or sitting down?
- Toilet: Where can the user comfortably reach while sitting or standing?
- Seated bathing: Can the user reach the bar without leaning or twisting excessively?
For older adults, people with limited mobility, or anyone who needs assistance with transfers, a qualified occupational therapist or accessibility professional may help determine suitable positions.
The goal is to apply the relevant measurements while considering how the person will move and use the grab bar in everyday situations. Do not compromise structural mounting or required accessibility dimensions simply to accommodate a preferred position.
Bathroom grab bars come in several designs to suit different needs and installation locations. Explore our guide to the different types of bathroom grab bars to understand the available styles and how to choose between them.
8. How to Measure and Mark Bathroom Grab Bar Height Before Installation
Measuring grab bar height correctly starts with identifying the right reference surface. Once you know the applicable measurement, you can mark the intended position, check the layout, and confirm that the wall can support the bar.
Step 1 — Identify the Correct Measurement Reference
First, determine whether the required height is measured from the finished floor or another reference surface.
For horizontal grab bars covered by ADA standards, height is measured vertically from the finished floor to the upper surface of the bar’s gripping area. For the specified lower horizontal bathtub bar, the measurement is taken above the tub rim.
Do not begin drilling until you have confirmed which measurement applies to the bar’s location and configuration.
Step 2 — Measure to the Gripping Surface
Measure the required height with a tape measure and mark the correct position directly on the wall. Account for the actual shape of the grab bar so the top of its gripping surface will reach the required position after installation.
For a horizontal bar, use a level to check the planned orientation. For a vertical or angled bar, mark the intended position according to the installation plan and applicable requirements.
The mounting holes may be above or below the gripping surface, depending on the bar’s design. Follow the manufacturer’s instructions to translate the intended gripping-surface position into the correct mounting-hole locations.
Step 3 — Check Position, Reach and Clearance
Before drilling, check the bar’s position in relation to the user and the surrounding fixtures.
Check that the grab bar can be comfortably reached from the user’s intended standing or seated position. Check for interference with shower controls, faucets, doors, seats, toilet paper holders, and other bathroom fittings.
For installations covered by the ADA, confirm the applicable clearances and positioning rules. In residential settings, also assess whether the bar will provide support during the movement it is intended to assist.
A measurement can be technically correct but still result in an awkward layout if the surrounding fixtures or the user’s movements are overlooked.
Step 4 — Confirm Structural Support Before Drilling
A safety grab bar must be mounted to a structure capable of supporting the loads placed on it. Tile and drywall are finish materials; they should not be assumed to provide sufficient structural support on their own.
Locate appropriate wall studs or blocking, or use an engineered mounting system specifically suitable for the wall construction and permitted by the applicable requirements and manufacturer instructions.
Do not assume that an ordinary towel bar, adhesive accessory, or suction-cup product provides the same support as a properly installed structural grab bar. Suction-cup bars may be intended for limited uses and should not be treated as permanent safety supports unless the product is explicitly designed and approved for that purpose under the relevant conditions.
If the wall structure is unclear or the intended mounting points do not align with the bar, consult a qualified installer before proceeding.
Step 5 — Verify the Installation
After installation, check that the grab bar is correctly positioned and securely mounted according to the manufacturer’s instructions.
Confirm that the bar does not rotate within its fittings, that the mounting hardware is properly secured, and that the gripping surface is free of sharp edges or abrasive defects.
The ADA Standards include requirements for grab bar installation, surface safety, and structural strength in covered facilities. For applicable installations, ADA Section 609.8 requires the grab bar and its mounting components, fasteners, and supporting structure to withstand a force of 250 pounds. This is a structural design requirement, not a recommendation to test a newly installed bar by applying an improvised load.
Do not use the bar for support if it moves, loosens, or appears damaged. Have the installation inspected and corrected before relying on it.
9. Bathroom Grab Bar Height Checklist: Common Measurement Mistakes to Avoid
Before installing a grab bar, review the measurements and installation plan. A short checklist can help catch errors that may otherwise be overlooked.
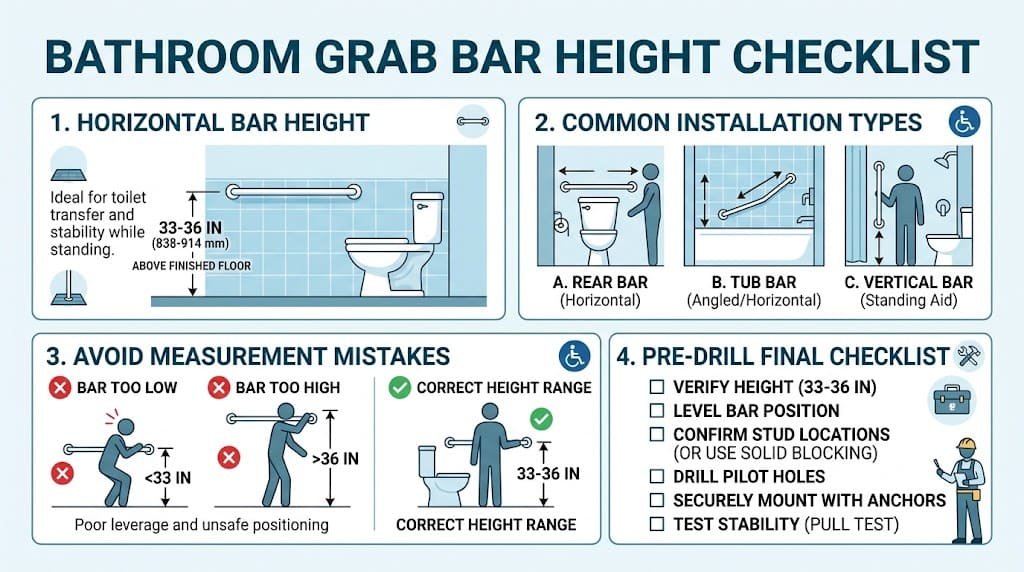
Use this checklist before drilling:
- Confirm the applicable accessibility standard, building code, or residential recommendation.
- Identify the correct measurement reference, such as the finished floor or bathtub rim.
- Measure to the top of the gripping surface where required.
- Distinguish horizontal, vertical, and angled bar positioning.
- Verify the bar’s length and location for the intended installation.
- Check nearby fixtures, controls, seats, doors, and required clearances.
- Confirm that suitable structural support is available at the mounting points.
- Follow the manufacturer’s instructions and applicable local requirements.
- Consider the intended user’s reach, grip, and movement needs.
- Verify that the completed bar is secure and does not rotate or loosen.
Several mistakes deserve particular attention.
Measuring from the wrong surface: A floor-based measurement and a tub-rim-based measurement are not interchangeable. Always confirm the reference point specified for the particular bar.
Using the wrong part of the bar: Measuring to a mounting flange or screw hole instead of the top of the gripping surface can produce an incorrect final height.
Applying one height to every orientation: The applicable horizontal-bar height range does not establish a universal position for vertical and angled bars.
Choosing length without checking the installation: A bar may fit the wall but fail to meet the applicable length or placement requirements.
Ignoring structural support: A correctly positioned bar is not safe to rely on if its mounting system cannot support the intended use.
The most reliable approach is to confirm the requirements, measure carefully, assess the wall and surrounding fixtures, and verify the finished installation before relying on the grab bar for support.
10. FAQs
How high should a bathroom grab bar be installed?
For horizontal grab bars covered by the ADA Standards, the specified height is generally 33–36 inches above the finished floor, measured to the top of the gripping surface. The correct position for a private residential bathroom depends on the intended use, the user, the installation location, and applicable requirements.
What is the ADA grab bar height requirement?
Section 609.4 of the 2010 ADA Standards specifies a height of 33–36 inches above the finished floor to the top of the gripping surface for applicable horizontal grab bars. Specific provisions, including those for the lower horizontal bathtub bar, establish different measurement references. The requirements apply to covered accessible facilities and configurations, not automatically to every private bathroom.
Is shower grab bar height different from toilet grab bar height?
For applicable ADA installations, the general height range for horizontal shower and toilet grab bars is 33–36 inches above the finished floor. However, the required arrangement, length, location, and clearance differ according to the shower or toilet configuration.
Should bathroom grab bars be installed horizontally or vertically?
The choice depends on the intended movement and installation location. Horizontal bars provide a gripping surface at a consistent height, while vertical bars may provide support at a shower or bathtub entrance. Angled bars offer gripping positions at different heights. Applicable accessibility requirements and the user’s needs should guide the selection.
How do you measure grab bar height from the floor?
Measure vertically from the finished floor to the top of the gripping surface when the applicable requirement uses that reference. Do not measure to the mounting flange or screw holes. For certain bathtub configurations, a lower horizontal back-wall bar is measured from the tub rim instead.
What is the correct height for the lower bathtub grab bar?
For bathtub configurations covered by the relevant ADA provisions, the lower horizontal grab bar on the back wall is positioned 8–10 inches above the tub rim. The main horizontal back-wall bar follows the applicable 33–36-inch floor-based height range. Always verify which bathtub configuration and provisions apply before installation.
11. Conclusion
The correct bathroom grab bar height depends on the installation location, bar orientation, and applicable requirements. For many horizontal grab bars in covered accessible facilities, the ADA specifies 33–36 inches from the finished floor to the top of the gripping surface. Certain bathtub configurations use an additional measurement of 8–10 inches above the tub rim for the lower back-wall bar.
Before installing a grab bar, confirm the correct reference point, check the required length and positioning, and ensure that the mounting system has adequate structural support. For a private home, consider the intended user’s reach and movements alongside applicable building codes and product instructions.
The goal is not simply to install a grab bar at the right height. It is to position and secure it so that it provides useful, reliable support where it is needed.
2 Comments